38 Command-line AMR prediction
- Apply a standardised workflow to predict AMR.
- Interpret the summarised results from multiple AMR-detection tools.
38.1 Funcscan workflow
Here, we introduce an automated workflow called nf-core/funcscan (Figure 38.1), which uses Nextflow to manage all the software and analysis steps.
This pipeline uses five different AMR screening tools:
ABRicateAMRFinderPlus(NCBI Antimicrobial Resistance Gene Finder)fARGene(Fragmented Antibiotic Resistance Gene idENntifiEr)RGI(Resistance Gene Identifier)DeepARG
See Course Software for a more detailed description of each tool.
Along with the outputs produced by the above tools, the pipeline produces a TSV file, which contains a summary of the results from all the AMR tools used:
hamronization_combined_report.tsv- produced by a software called hAMRonization
This is convenient, as we can obtain the results from multiple approaches in one step.
38.2 Running nf-core/funcscan
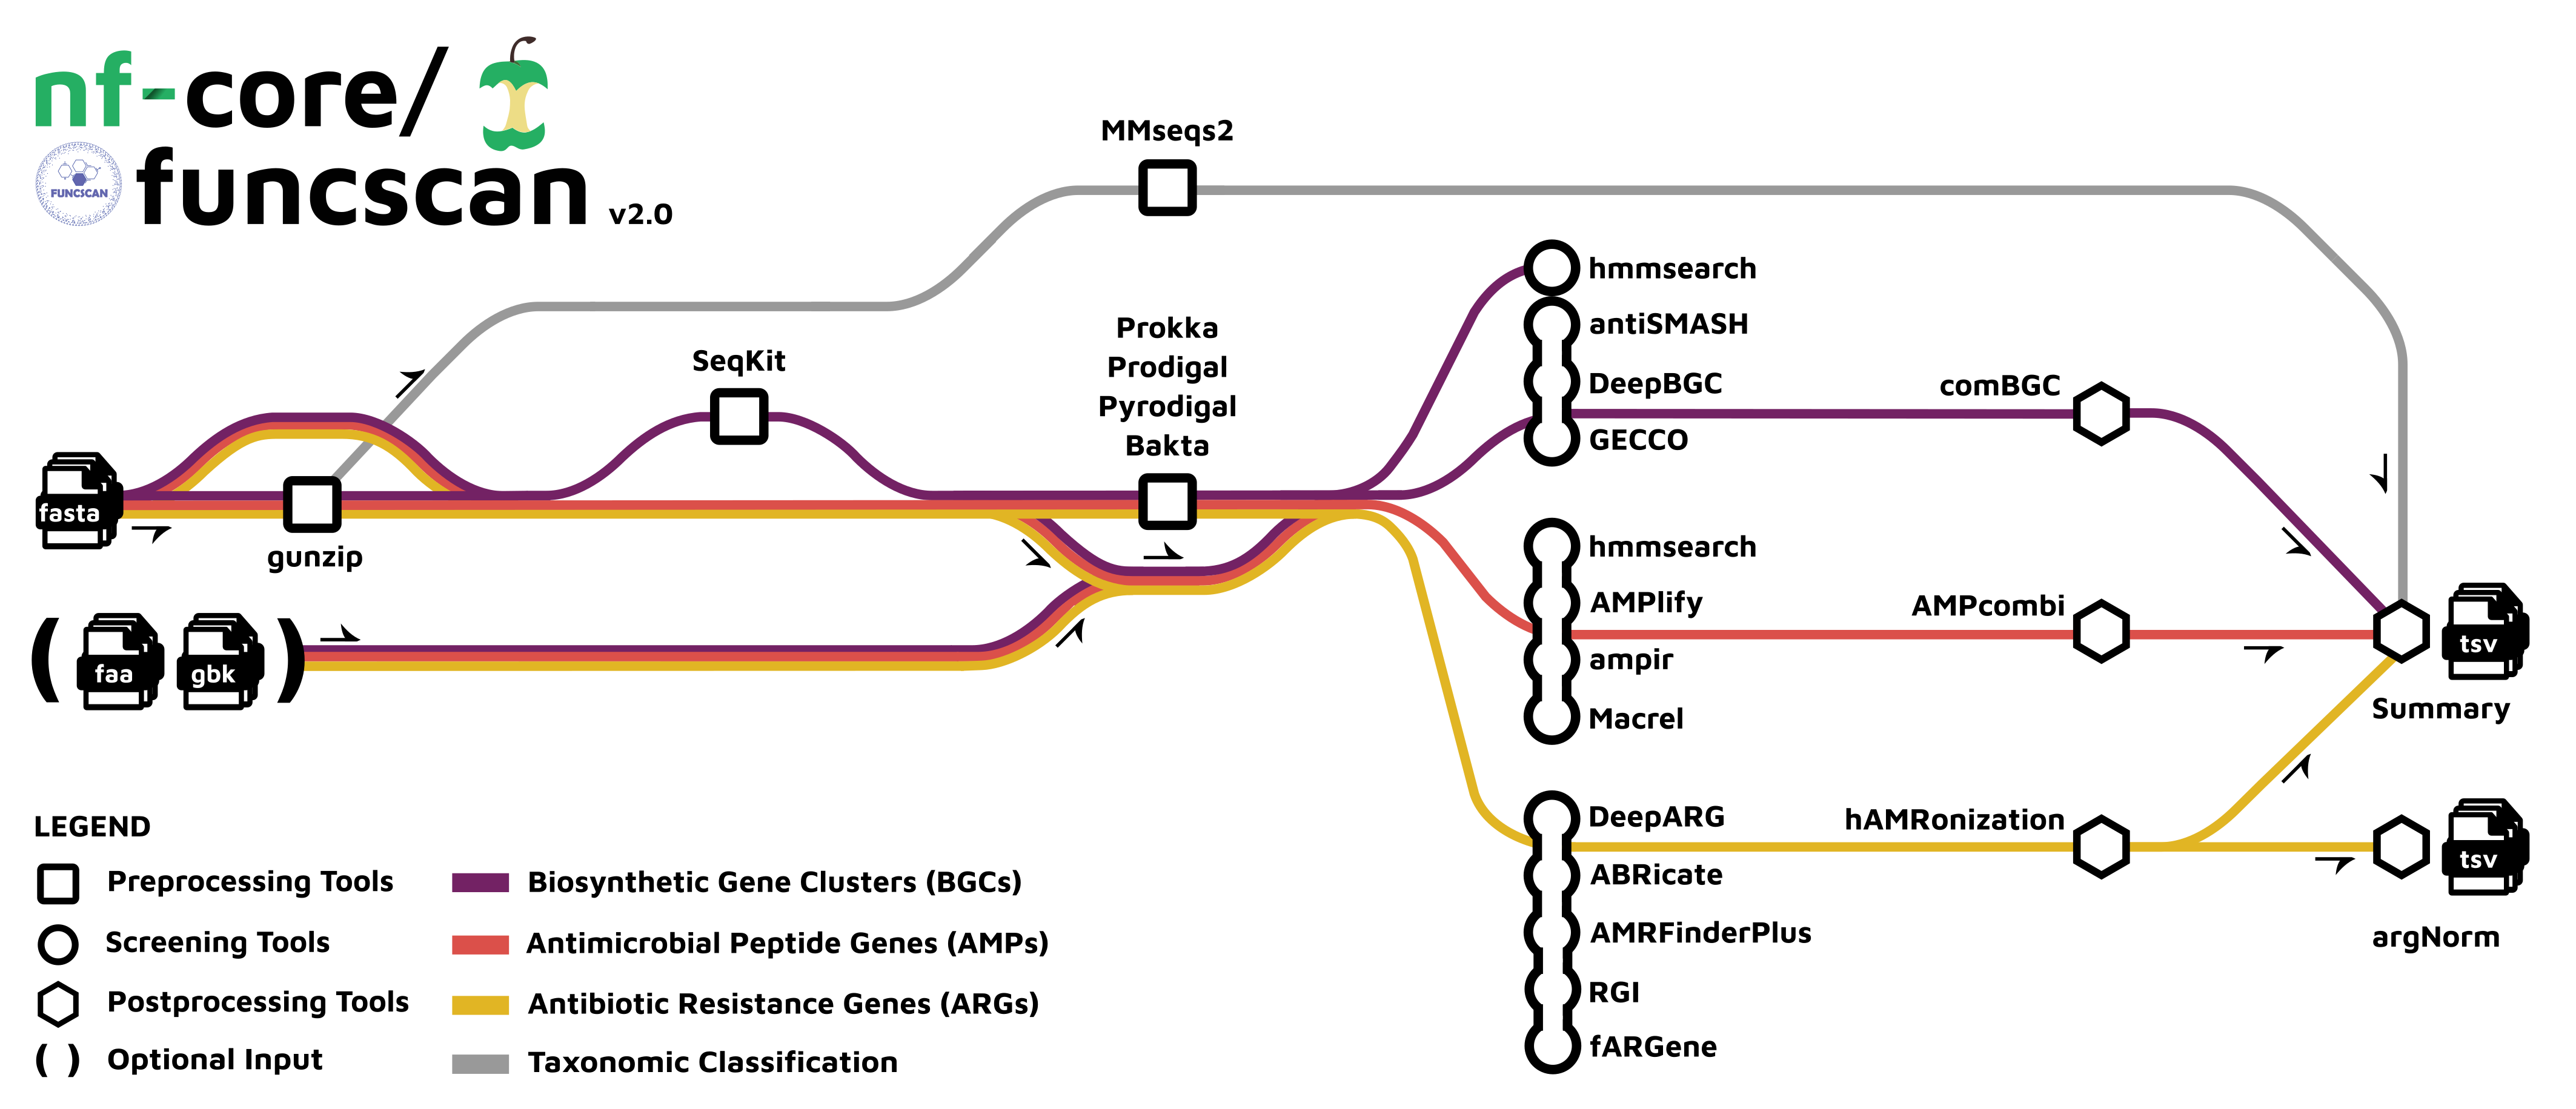
nf-core/funcscan workflow. In our case we will run the “Antimicrobial Resistance Genes (ARGs)” analysis, shown in yellow. Image source: https://nf-co.re/funcscan/1.1.2
We are going to use the assemblies we generated for S. pneumoniae using the assembleBAC pipeline as input for funcscan and these are located in preprocessed/assemblebac/assemblies
The funcscan pipeline requires us to prepare a samplesheet CSV file with information about the samples we want to analyse. Two columns are required:
sample–> a sample name of our choice (we will use the same name that we used for the assembly).fasta–> the path to the FASTA file corresponding to that sample.
You can create this file using a spreadsheet software such as Excel, making sure to save the file as a CSV. To to get you started in creating this file, we can save a list of our assembly file names into a file:
ls preprocessed/assemblebac/assemblies/*.fa | head -n 5 > samplesheet_funcscan.csvIn this case, we only list the first five files (head -n 5), to save time when running the pipeline. In your own data, you should get all the files.
We then open this file in Excel and edit it further to have the two columns examplined above. Here is our final samplesheet:
sample,fasta
ERX1265396_ERR1192012_T1,preprocessed/assemblebac/assemblies/ERX1265396_ERR1192012_T1_contigs.fa
ERX1265488_ERR1192104_T1,preprocessed/assemblebac/assemblies/ERX1265488_ERR1192104_T1_contigs.fa
ERX1501202_ERR1430824_T1,preprocessed/assemblebac/assemblies/ERX1501202_ERR1430824_T1_contigs.fa
ERX1501203_ERR1430825_T1,preprocessed/assemblebac/assemblies/ERX1501203_ERR1430825_T1_contigs.fa
ERX1501204_ERR1430826_T1,preprocessed/assemblebac/assemblies/ERX1501204_ERR1430826_T1_contigs.fa
Once we have the samplesheet ready, we can run the nf-core/funcscan workflow using the following commands:
# activate the environment
mamba activate nextflow

# create output directory
mkdir -p results/funcscan

# run the pipeline
nextflow run nf-core/funcscan \
  -r "2.1.0" \
  -profile singularity \
  --input SAMPLESHEET \
  --outdir OUTPUT_DIRECTORY \
  --run_arg_screening \
  --arg_rgi_db databases/card/ \
  --arg_skip_deeparg
The options we used are:
-profile singularity- indicates we want to use the Singularity program to manage all the software required by the pipeline (another option is to usedocker). See Data & Setup for details about their installation.--input- the samplesheet with the input files, as explained above.--outdir- the output directory for the results.--run_arg_screening- indicates we want to run the “antimicrobial resistance gene screening tools”. There are also options to run antimicrobial peptide and biosynthetic gene cluster screening (see documentation).--arg_rgi_db databases/card/- indicates we want to use a pre-downloaded version of the CARD database. This is optional, and the workflow will download this automatically if you don’t include this option. However, if you run this workflow regularly, it is a good idea to pre-download the database as it saves time and bandwidth.--arg_skip_deeparg- this skips a step in the analysis which uses the software DeepARG. We did this simply because this software takes a very long time to run. But in a real analysis you may want to leave this option on.
38.2.1 funcscan results
After running the pipeline, we can look at the output directory in results/funcscan (if your pipeline finished running), or you can also use the preprocessed/funcscan results. There are various directories containing output files:
| Directory | Description |
|---|---|
arg |
Contains the results of running the ARG (Antibiotic Resistance Genes) sub-workflow |
reports |
Contains the hamronization_combined_report.tsv file |
multiqc |
Contains a html file containing summaries of the various outputs |
pipeline_info |
Contains information about the pipeline run |
38.2.2 The hamronization_combined_report.tsv report
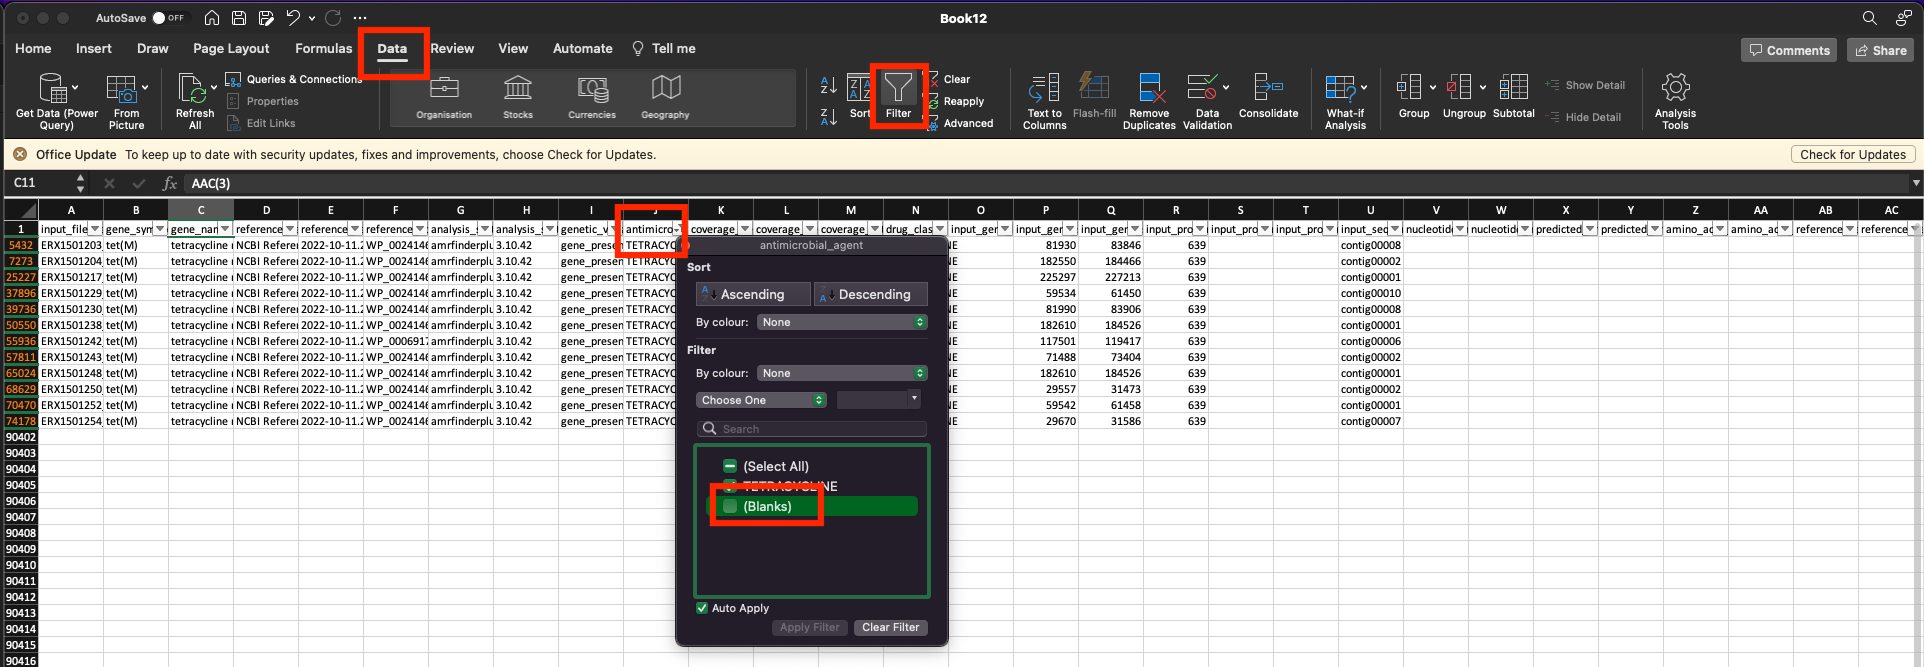
The main output of interest from this pipeline is the hamronization_combined_report.tsv file, which contains a summary of the results from all the AMR tools used (make sure to use the version in preprocessed/funcscan/reports). You can open this file using any standard spreadsheet software such as Excel (Figure 38.2).
This file is quite large, containing many columns and rows. You can find information about the column headers on the nf-core/funscan “Output” documentation page. The easiest way to query this table is to filter the table based on the column “antimicrobial_agent” to remove rows where no AMR gene was detected (Figure 38.2). This way you are left with only the results which were positive for the AMR analysis.
38.2.3 Results from other tools
You can also look at the detailed results of each individual tool, which can be found in the directory preprocessed/funcscan/arg. This directory contains sub-directories for each of the 5 AMR tools used (in our case only 4 folders, because we skipped the DeepARG step):
ls preprocessed/funcscan/argabricate amrfinderplus fargene hamronization rgiFor each individual tool’s output folder shown above, there is a report, which is associated with the predicted AMRs for each of our samples. In most cases, the report is in tab-delimited TSV format, which can be opened in a standard spreadsheet software such as Excel. For instance, the AMR report from Abricate for one of our samples looks like this:
less -S preprocessed/funcscan/arg/abricate/ERX1501203_ERR1430825_T1/ERX1501203_ERR1430825_T1.txt#FILE SEQUENCE START END STRAND GENE COVERAGE COVERAGE_MAP GAPS %COVERAGE %IDENTITY DATABASE ACCESSION PRODUCT RESISTANCE
ERX1501203_ERR1430825_T1_contigs.fa contig00008 81930 83849 + tet(M) 1-1920/1920 =============== 0/0 100.00 100.00 ncbi NG_048235.1 tetracycline resistance ribosomal protection protein Tet(M) TETRACYCLINE
For this sample there was just one putative AMR gene detected by Abricate, associated with tetracycline resistance. These genes were identified based on their similarity with annotated sequences from the NCBI database. For example, the gene Tet(M) was detected in our sample, matching the NCBI accession NG_048235.1. This is annotated as as a reference for antimicrobial resistance, in this case to the drug “TETRACYCLINE”.
Here is a trick using standard commands to count how many times each drug was identified by funcscan:
cat preprocessed/funcscan/reports/hamronization_summarize/hamronization_combined_report.tsv | cut -f 10 | sort | uniq -ccatprints the content of the filecutextracts the 10th column from the filesortanduniq -care used in combination to count unique output values
The result of the above command is:
1 antimicrobial_agent
12 TETRACYCLINE
38.3 Summary
- The
nf-core/funcscanworkflow performs AMR analysis using several software tools. It requires as input a samplesheet with sample names and their respective FASTA files. - The results from the several AMR tools are summarised in a single report, which can be conveniently used to filter for putative resistance to antimicrobial agents.